Thursday, January 26, 2012

Retro Gossip Bench Re-do

I haven't posted in a few days because I've been busy working on this 
little gossip bench project!  
What do you think? I am very happy with it. 


A quick history: The "gossip bench", sometimes referred to as a telephone table or telephone bench, consists of a seat and a small table the phone rests on.They were made of many different materials and in many styles. The "gossip bench" got its name because people sat on the bench and "gossiped" on the phone. During the 50's and 60's gossip benches were all the rage.

Today, vintage gossip benches are plentiful and available at reasonable prices. If you are willing to do a little work, you can really get a deal on a gossip bench that is not in great shape and you can make it blend with your decor and style. Gossip benches are still a great place to sit and chat on the phone but they can also serve many other functions. With such a small footprint, a gossip bench can work well in a variety of places. In an entry foyer, its a great place to drop your purse, mail, keys etc. Instead of an old school phone, a gossip bench can be an ideal place to set up your cell phone docking station. The possibilities for incorporating a gossip bench into your decor are limitless!

Now, my gossip bench re-do! 
You know that you'd need to clean, prime & paint the metal so I won't bore you with all that! 


Making the seat: 
I have the plywood base, a layer of air filter mesh, foam and the black muslin I am using for the under layer of the upholstery.


The key to getting this done properly is to stretch the fabric and staple as you go.


Getting the corners done right is a matter of stretching, gathering, smoothing and stapling. 
If you mess up (and I do a lot!), just pull the staple out and have a mulligan!


This first layer of fabric is called the "underwear". 
In upholstery world, it is designed to give the seat a complete wrapping 
before putting on the final fabric. 
If you want to change out the fabric later on, you can take the fabric off down to this layer 
and then just add new fabric.


Adding the final fabric and working on the corners


until It looks a lot like a package!


Next, covering this bottom with the black muslin to make it look neat.


This step hides a lot of sins!


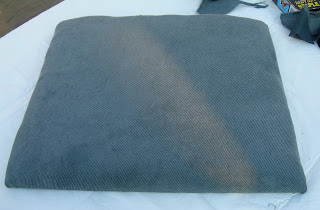
Here is the finished seat!


I bought these little strap clips to attach the wood bottom to the metal on the bench.


I used four and it is very secure.


Here it is, assembled and ready to use!

I bought it at the Goodwill auction for 5 bucks. Altogether, I spent another 10 bucks on wood, fabric and supplies to build the upholstered seat. For 15 bucks and a few hours of my time, I've got my 60's gossip bench!


In the foyer, ready for a call or to hold a purse or to keep track of my keys!


Do you have a place for a gossip bench? 
Then get one and get started on your Gossip Bench Re-do! 
Enjoy!


Friday, January 20, 2012

Rewiring Vintage Lamps

I absolutely love retro vintage lamps. The funkier the better! 
I run across them all the time at yard sales and estate sales. 
There is only one problem: the wiring usually scares me! 


Even if the cord is not brittle, broken or compromised in some way, it scares me that there might be damage I can't see and it might cause a fire. I always, always, always rewire vintage lamps I buy. For about 8-15 bucks at any Home Depot or Lowe's (or cheaper if, like me, you buy them at estate sales or garage sales in unopened condition for even less!), you can purchase an entire kit to change out the wiring and make the lamp safe to use!


If you have never rewired a lamp, you might think you are in way over your head. Don't be intimidated! This is not rocket science: it is a very simple DIY project. Conveniently inside or on the back of the wiring package are simple diagrams illustrating what to do. It is so simple you'll wonder why it seemed so mysterious.

So go find yourself a really cool lamp and give it a try.

Here are the basics, step-by-step:

You learn how to put your lamp together by first taking it apart!
  • If it is plugged in, unplug it and if it has a bulb in it, take it out.
  • Spread out some newspaper on a table to catch your mess.
  • Remove the felt that is typically on the bottom of ceramic or glass lamps. 
    (If you can't get it off in one piece it is very easy to replace with a piece of felt that you can glue back in place once you are done.)


  • Loosen the screws on the socket and pop it apart
  • Unscrew the wire from the socket on both sides
  • Pull the wire out of the lamp


Now that everything is apart, 
you are going to rewire it by reversing the steps you did to take it apart.

  • Push wire up thru lamp


  • Bend the edges of the wires into a hook
  • Attach the wire on each side of the socket, tighten the screw clockwise


  • Tighten the screw on the socket attachment to the lamp
  • Pull the cord back into the lamp
  • Add socket cover & snap in place
  • Re-glue bottom felt


  • add a bulb
  • plug it in and turn it on


Shazam!
You did it!
Now don't you feel like a rocket scientist?

Next time you see a really cool lamp priced really well, don't walk away from it!
Buy it, rewire it and save yourself a bunch of money 
while getting a really cool addition to your decor!


Wednesday, January 18, 2012

Libbey Silver Leaf Glasses

Crazy about the television show "MAD MEN"? Love that sophisticated 60's look? Here's a really inexpensive way to put some of that "MAD MEN" punch into your bar glassware - Libbey Silver Leaf Glasses!


The Libbey Glass Company is one of the longest running and most commonly recognized companies in glass manufacturing. It started business in 1818 and comes out of Toledo, Ohio. The Silver Leaf glassware pattern is one of Libbey's lines which was produced from 1953-1978. It is plentiful and relatively cheap for glassware and is readily available at yard sales, estate sales and antique shops. I've picked them up for as little as a quarter a glass and have never paid more than a few dollars per glass.

Once you have spotted it, you'll always know it. The pattern has a bit of frosting on the glass with silver leaves going around the body and a silver rim at the top. 


The Silver Leaf pattern came in a multitude of shapes and sizes including sherbets (or champagnes, both short & tall stem), wines, waters, pilsners, iced teas, juices, and several straight sided sizes including Hi balls (or On-the-rocks or Old fashions as they were called back in the day). There are also a few other pieces I've come across including an ice bucket, small pitchers, and Cream & sugars.


One word of caution: don't put these in the dishwasher! If you do, you will compromise the applied silver design. As is typical of many of the glassware items made in the 50's and 60's before dishwashers were found in every home, these glasses were just not made for the punishment of a dishwasher. If you don't like to hand wash glasses, you shouldn't buy these. But if you don't mind washing them, they will give you a really classy 60's look at really great prices!  


Tuesday, January 17, 2012

Retro, Vintage Wallpaper

I found some awesome vintage wallpaper at a yard sale. There were three rolls. Two were of a huge floral pattern that was flocked in gold and reminded me of an old grandma house. Just not my vintage retro style!

I bought the third one because I thought it was fun and cool. Here it is.


Crazy right? I bought the roll for ten bucks. It SCREAMS 1950-60's kitschy pad. I could just see it on the wall in a basement rec. room behind the requisite swinging bar (Pre-"Man Cave"). There are probably more than a dozen yards. I have no idea what I was going to do with it but I had to buy it.

If anyone has any great ideas for what to do with it, let me know in a comment! Thanks! Stay tuned for a blog project in the near future.

Saturday, January 14, 2012

Cooking with Katie - The Back Story


I hope you will indulge me while I tell you a little story about my beloved Irish Mother, Katie.

Katie did not give birth to me but she did give birth to my friend, Moira who very kindly shared Katie with me since our college days. That's how I got my Irish Mother.

Katie was a force of nature. I adored her with my whole heart. She taught me so many things and it was my privilege to know her. She gave me many gifts over the years, but her love was the greatest gift of all.

Katie was well known as a fantastic cook and baker. There were things she was well known for and favorite things she just liked to fix because we all loved them. I was the grateful recipient of many of her kitchen offerings.

Katie passed away in August 2010. Her fan club was with her and she went peacefully and on her own terms. In December 2011, another gift from Katie arrived via email from her daughters. A typed copy of all the recipes she had hand written or dog-eared here and there. It was the coolest thing I got for Christmas (please don't anyone else be mad at me - I loved your gifts too!).

My intention is to cook or bake all of Katie's recipes and share them with all of you as I go. Thanks for joining me on this gastronomical love fest - Cooking with Katie!

Thursday, January 12, 2012

Goodwill Hunting Score

Like many others of you, I'm a Goodwill hunter. 
Here's the story of my latest score.


Actually, I visit not just Goodwill but all the thrift stores in town! In our town, Goodwill has morning auctions 3 mornings and one evening a week. The Goodwill staff sorts through donations and brings items to auction. A lot of the items are not things I am interested in but, every now and again, I find some items I am interested in bidding on. The morning auctions have a preview at 8 a.m. and the auction begins at 9 a.m. They start by auctioning electronics, musical instruments and a few high ticket antiques or collectibles. Then they move on to huge rolling carts and shopping carts of miscellaneous items. Finally, they go to furnishings and large household items. They usually get to that area by 10:30 a.m.

I try to get to the auction by 8:30 or 9 a.m. so I can look around. Sometimes I see nothing I am interested in and other times I find items I think I can use, repurpose or rehab. I examine them closely, make sure they are sturdy or can be repaired and set my top bid in my mind so I don't get caught up in the excitement of the auction. If I know I am not going to bid until 10:30 or after, I use that time to hit a couple of nearby thrift stores to see what they might have. Then it is back to the auction to see if I can get lucky!

At a recent Friday morning, I did the auction and the thrift store circuit and scored a bunch of things. To illustrate what an eclectic variety of items you might encounter, I'd like to recap my recent purchases.

I was interested in bidding on a few items at the Goodwill auction including the Santa, the metal 1960's gossip bench. I set my limits in my mind and I headed off to the thrift stores.

At the first thrift store, I bought the 1960's bedside table. While red is my favorite color, I was not feeling it on this piece of furniture. The piece was heavy and sturdy so I figured a coat of paint would tone down the garish look of its current state. I'll post later on that piece when I re-do it! $5.98 and into the truck it went!


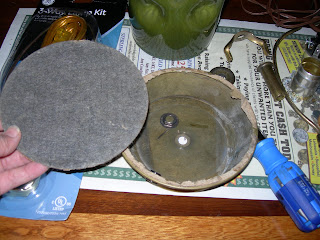
Second stop yielded the vintage encyclopedia bookcase, the Dolphins trash can and the vintage metal serving tray. Eight bucks on the bookcase and fifty cents each on the tray and trash can. My favorite CPA is going to love that Dolphins trash can in his man-cave! The bookcase may get a quick polish or a coat of paint - haven't decided yet! I also got a lampshade, a mirror tray, a mug and 2 dozen xmas glass balls for two bucks. All those items will be used in future projects.


Third and final thrift store stop brought me to the purchase of the wheelchair. $25 bucks. You might think thats an odd purchase but my Mom was having a knee replacement in a week and I knew it would come in handy to get her around until she got her endurance back. My friends and I had what we called the "community wheelchair" but it went away and we needed another. It will live in my friend's garage and whenever anyone needs it for a visiting grandparent or family member, we'll have it available. The old one got a fair amount of use and I'm sure this one will too. For $25 bucks, it is well worth the investment.


Finally, I returned to the auction where I got the blowmold Santa. He is almost five feet tall and will make a great Christmas display. $25 bucks. The best deal of the day, by far, has to be the metal 1960's gossip bench. Five bucks at the auction! I will give it a good cleaning, spray paint it and give it an upholstered seat and it will be great! I'll post that project in a later blog.


Grand total of my little adventure: $72.00.
Hours of project fun to follow: Priceless!

Check the Goodwill website for an auction near you!
Hope you will score too!
Post a comment if you do - I'd love to hear about your finds!

Happy hunting!


Wednesday, January 11, 2012

1930's Metal Bed Gets a New Life

Last summer, my niece Maria was ready to part with the pretty, pretty princess pink room of her childhood and move on to something more in keeping with her current teenage style. Her stepping off point and inspiration was her love of horses. 


After a coat of paint on the walls, new bed linens and curtains and horse related accessories here and there, the look was coming together just as she had hoped. The only thing missing was to swap the twin bed of childhood and bring in a full size bed. She had a mattress, box spring and basic frame but no headboard or footboard. So the hunt was on!


Being her "Crazy Aunt" has its responsibilities and getting Maria's room done completely was big on my priority list.  The bed would be a focal point in the room so it had to have the right look and feel to go with the new look that she was after. Fast forward to the Route 11 Yard Crawl, an annual event held in the Shenandoah Valley of Virginia in August. 


see: http://www.virginia.org/Listings/EventsAndExhibits/Route11YardCrawl/ 


At the Yard Crawl, I came across an old metal bed from the 1930's that had great bones and was probably beautiful back in the day. Unfortunately, it was no longer beautiful. It was covered with faux fur which, once removed, revealed an ugly gold paint job. I started to sand it and I found its underlying beauty. 


The footboard illustrates what it looked like once the faux fur was removed and the headboard illustrates what it looked like once I got the ugly gold paint off it.

I went to work sanding the whole bed. Then, I primed and painted the design area in a satin white. Once that was done, I covered it with cardboard and primed the rest of the bed with a black spray primer. Finally, I painted it out in a hammered black paint. I painted the whole thing except the area of the design which was still covered in cardboard to protect the white paint.


 Next, I removed the cardboard and took a pencil and a metal measuring stick and lightly penciled in all the lines in the design. 


 Then, I covered the areas I wanted to remain white with this cool frog tape which is really great. I used an exacto knife and my metal ruler to get crisp, straight lines.


I finished the hammered black paint job by painting over the frog tape 
and touching up everything to give it the final finish.


Using my exacto knife, I pulled off all the tape revealing the white areas.


 It looked great but was very two dimensional, not at all like it looked in the original version.


I pondered what to do and decided I'd try my hand at pin-stripping! 
After a visit to the auto store to get supplies, I watched a few demo videos on line. 
Feeling a little more confident after the tutorials, off I went doing the pin-stripping. 


Check the dramatic difference the pin-stripping made! 
Now it looked 3-D like the original version!


You can see the before and after effect the pin-stripping had on the project . 
The headboard has pin-stripping, the footboard does not.
The pin-stripping really pops the design like I had hoped. 

And with Maria's permission, here's a photo of the bed in its completed state.


I knew this bed had potential!

Look around and see the potential in all the things that surround you! 
Believe in yourself even if you've never tried to do something before. 

Who knows, you might be able to add pin-stripping to your DIY resume!